Sunday, 28 June 2020

Loss, Rediscovery & Rearrangement - Romilly Saumarez Smith at the Harley Gallery

Squashed Coral Thimble - Romilly Saumarez Smith

This time last year (May 2019) the Harley Gallery, which is on the Welbeck Estate near Worksop, held an exhibtion - Loss, Rediscovery & Rearrangement by Romilly Saumarez Smith.


Pilgrim's Mirror Case With Whisk - Romilly Saumarez Smith

The exhibition title refers to jewellery and boxes Romilly Saumarez Smith has made from metal detecting finds that have lain beneath the ground for hundreds of years.  She envisages a new future for these pieces and because a neurological disorder means she can no longer do it herself, this vision is then brought to fruition by her asssistants - Lucie Gledhill, Anna Wales and Laura Ngyou.

Tree Handles - Calligraphic Tree - Romilly Saumarez Smith

These days, Saumarez Smith scours Ebay for her finds - medieval pins, Anglo-Saxon nails, watch winders, thimbles - and transforms them into contemporary treasure.

Tree Handles - Helianthus Tree - Romilly Saumarez Smith

I thought these pieces were exquisite.  It was by chance I came across the exhibition and I'm so glad I did!

Saumarez Smith was a Woman's Hour Craft Prize finalist in 2017.  You can hear her talking about her work here.

And just a word about the Harley Gallery which is not to be missed if you are in the neighbourhood.  It has interesting exhibitions, a good shop and there are places to grab a bite nearby.  Do go if you can - it is re-opening on the 1 August 2020!


Saturday, 20 June 2020

Ruth Asawa at David Zwirner, London

Ruth Asawa - Untitled - Hanging Sculptures - Different Wires

Earlier this year I visited the David Zwirner Gallery in London to see the Ruth Asawa exhibition - A Line Can Go Anywhere.  Ruth Asawa (1926-2013) was a Japanese American sculptor, educator and arts activist who grew up in California.  Her parents were farm workers.  Following the Japanese attack on the US naval base at Pearl Harbour, Ruth and her family were interned along with many other Japanese Americans.

Ruth Asawa and Her Wire Scupture 2 - Imogen Cunningham

After her release from internment, she studied at Black Mountain College in North Carolina. Here Asawa was taught by Josef Albers, Buckminster Fuller and the mathematician, Max Dehn.  She met many inspiring people at Black Mountain College, including Albert Lanier, an architectural student, who became her husband and with whom she had 6 children.

Ruth Asawa - Untitled - Hanging Sculpture (detail) - Galvanised Steel & Iron Wire
Ruth Asawa - Untitled - Hanging Sculpture - Steel Wire
During a trip to Mexico in 1947 a local craftsman taught Asawa how to create baskets out of wire.  She developed this technique to make her hanging sculptures which take on many shapes and forms. Later, inspired by nature, Asawa developed a new set of tied wire forms.

Ruth Asawa - Untitled - Wall Mounted Sculpture - Bronze Wire


Ruth Asawa - Wintermass - Hanging Sculpture - Stainless Steel Wire Tipped with Resin

Asawa was active in introducing arts education to local schools.  In 1968 she set up the Alvarado School Arts Workshop which brought professional artists into the classroom to teach art, gardening, music and theatre.  It spread throughout San Francisco's public schools.  In the 1980s, she founded a high school for the arts later renamed the Ruth Asawa San Francisco School of the Arts.  In 2009 Ruth's Table was founded in San Francisco to foster opportunites for older adults and adults with disabilities to express their creativity.

Ruth Asawa - Untitled - Freestanding Sculpture - Electroplated Copper Wire

Her wire forms are fascinating and had a look of knitted structures.  It was a great exhibition.


Saturday, 13 June 2020

Dyeing with Forget-Me-Nots

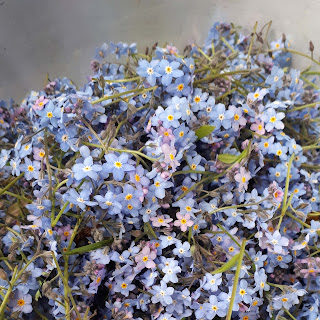
Basket of Forget-Me-Nots

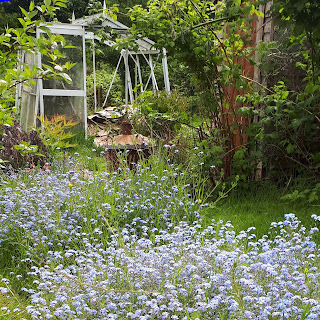
Having had some success with my rhubarb leaf dyeing, and more limited success with dandelions, I decided to have a go with forget-me-nots as this is another plant that we had in abundance in our allotment...

Forget-Me-Nots in the Allotment

Having gathered them, I pulled the flowers off and added them to the dye pan. I had a little more weight in forget-me-not flowers than in fabric but not a lot and certainly not twice the weight of fabric in forget-me-nots which would have been ideal....

Forget-Me-Not Flower Heads in the Dye Pan

Dye Pan Flower Detail
The fabrics I chose to dye were some wool yarn, wool blanket and cotton calico.  They were soaked overnight in soy milk which I had read acted as a mordant for cotton fibres.  A mordant is a dye fixative.  It helps bind the dye to a fabric to make it more colourfast and can affect the resulting colour.  For example, mordants may intensify the dye colour.  Alum was recommended for wool but I didn't have any of that so I soaked them all in the soy milk (1 part soy milk to 4 parts water).  I could only get light soy milk.  I don't think this worked as well as ordinary soy milk would have.  I dried the fabric before putting it in the dye bath.

Fabric to Dye

To make the dyebath, I covered the forget-me-nots with water and simmered them for an hour and then removed the plant matter by straining. 

Sieve of Plant Material to be Discarded

The remaining liquid formed the dyebath to which I added the dry fabric.  My pan was aluminium as this was all I had. Ideally you would use a non reactive pan made out of stainless steel.   I simmered the dyebath for about an hour, during which I added a few rusty nails as nothing much seemed to be happening.  I thought this might help as you can use iron as a mordant too.  The recipe for an iron based mordant involves soaking some iron objects in 2 parts water to one part vinegar solution for a couple of weeks until it goes a rusty orange colour so this intervention was unlikely to have a great effect.

Dye Bath & Fabric

I left the dyebath to cool overnight...

Dye Bath After Cooling Overnight

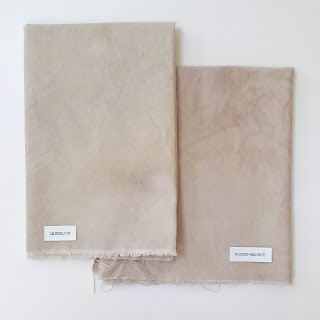
The following day I rinsed out the materials, washed them and hung them up to dry.  Here are the results together with a little sample of the original fabric to show the colour change...

Before and After Dyeing Results

I was hoping for a blue colour and when the dye pan started heating up the water was very green so I thought a greeny colour might be a possibility.  However, the outcome was very similar to that of the dandelion dyeing which frankly, was a little disappointing. I may have overheated the dyebath which resulted in a more neutral colour than expected. I would also probably have got a better result if I'd been more careful with the mordanting process and used more forget-me-not heads.

Forget-Me-Not Dyed Items

The forget-me-not yarn and blanket were slightly paler in colour than the dandelion dyed pieces and the calico was very similar in colour bit a slightly different shade...

Wool Yarn

Wool Blanket

Calico

Not sure yet what I shall use the fabric and yarn for but interesting to experiment.  Why not have a go with some of your abundant plants?


Sunday, 7 June 2020

Rainbows for Rowntree Park - Stitching Hope

Hope in stitch

As you may have read in a previous post - the Friends of Rowntree Park Craft Group are organising a Rainbows for Rowntree Park Yarnstorm as a big thank you to everyone who's helped us in these difficult times and as a celebration of the park itself.  You can read all about it here.  They would like you to make 6 inch/15 cm squares or flowers in one of the colours of the rainbow - red, orange, yellow, green, blue, indigo or violet - for a large rainbow display in the park. (Alternatively, you can make little whole rainbows which will hang in the arbour).  These can be knitted, crocheted, stitched, embroidered or felted depending on your preference. 

Just recently I have been working on an embroidered orange square of hope.  Using some orange calico that was backed with iron-on vilene as a base...

Calico backed with iron-on vilene

I cut out a piece a little bigger than 6 inches/15 cm square.  Then I printed out the letters of HOPE on paper in an appropriate size and font, cut them out and used them as templates...

Letter templates & Frixion pen

Using a Frixion pen (the ink disappears when you iron the fabric), I marked out the 6 inch/15 cm square, divided it into 4 and drew round the letters...

Square and letters marked out

Then I started stitching by first completing the dividing lines between the letters.  (I should also have stitched round the outline too as the ink faded and I ended up guessing where the edge was!) Each letter was completed in a different stitch.  The letter was densely stitched and the surround was much more openly stitched...

H in back stitch and seed stitch

O in chain stitch and detached chain stitch

P in French knots

E in cross stitch

Here's what it looks like on the back...

Messy reverse side

I cut out another piece of orange calico, added some ribbons to it in the corners as I thought they might be useful for attaching the square in the rainbow (if not required they can easily be cut off)...

Reverse side with ribbons

Then I bonded the front and the back together using bondaweb, (an iron on adhesive), and cut it to the correct size.  To finish off I machine stitched round the edge using a zigzag stitch...

Finished orange square

Why not join in with the Rainbows for Rowntree Park Yarnstorm?  The more people take part the better the display! You can make your squares as simple or elaborate as you like.  Here's my yellow square in crochet...

Yellow crochet square

and here are my knitted squares...

Knitted squares

Here are a few flowers I made...

Knitted and stitched flowers

and here are some rainbows...

Knitted rainbows

All the details can be found here.  Your makes have to be delivered by the end of June and will hopefully go up in Rowntree Park in time to mark the Park's 99th Birthday on Saturday 18 July 2020. I can't wait to see your makes!  Do post pics on social media using #RainbowsforRowntreePark.